
1. Choose your widget
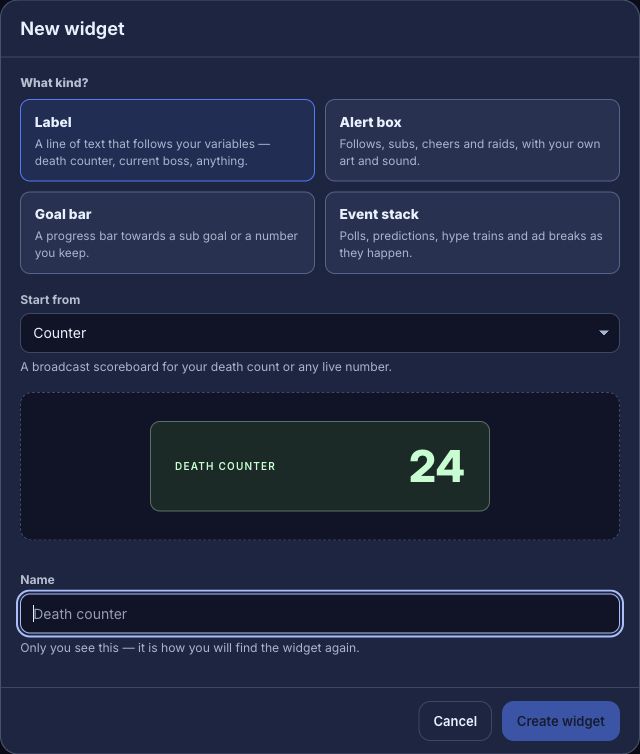
Open Widgets → New widget. Pick a type, select a starting design and give it a name you will recognise. The name is for finding the widget in your dashboard.
| Type | Good for |
|---|---|
| Label | A counter, a line of text or a recent subscriber |
| Alert box | Follows, subs, cheers and raids with art and sound |
| Goal bar | Progress towards a goal or a stored number |
| Event stack | Polls, predictions, hype trains and ad breaks |
2. Configure and preview
- Press Create widget, then adjust the content and design in its editor.
- For a counter or live label, choose the variable or data field it should display.
- Use the preview to check text length, size and placement. Save your changes.
- Copy the widget’s URL from its OBS section or the widget list.
3. Add the Browser Source
- In OBS, open the scene that should show the widget.
- Add a Browser Source in Sources and give it a clear name.
- Paste the copied widget URL into the URL field. Hosted widgets use a web URL, so leave Local file off.
- Set Width to 1920 and Height to 1080, then position the source in your scene.
- Keep the scene visible while checking the widget. Save another design change in Bloopbot and confirm it appears in OBS.
Move a goal bar or counter from a flow
A goal bar set to Your own number, and a label that shows $(var.deaths), both follow a variable. A flow never talks to the widget: it changes the variable with Set variable, and every widget watching that variable updates on its own. The quickest start is a pack from Flows → + New flow.
| Pack | Variable it keeps | Point this widget at it |
|---|---|---|
| Goal bar | goal — new subs, resubs and gifted subs add to it; !goal, !addgoal 5 and !setgoal 0 read and steer it | Goal bar → source Your own number → variable goal |
| On-screen counters | deaths and wins — !death, !win and a reset for each | Label → text Deaths: $(var.deaths) |
- Install the pack and let the install prompt create its number variables.
- Create the widget and point it at the same variable name. The Goal bar’s Your own number design already follows
goalwith a target of 100, and the Label’s counter design already shows$(var.deaths). - Type the command in chat, or use Test fire on the flow, and watch the widget move.
- To count something else — bits, follows, raids — open one of the installed flows, swap its trigger, and set how much Set variable adds.
Using a Twitch-goal bar or your own widget? Those listen for Twitch goal events, not a variable. Add the Show a goal action (under Overlay) to a flow: give it where the goal is now, such as $(var.goal), and what it is aiming for. It puts the goal on every widget that shows Twitch goals, remembers it for a widget that connects later, and steps aside while a real Twitch goal is running. The Goal bar pack includes a flow that does this whenever goal changes; use Finish the goal in the same action to take it down.
The Event stack widget shows polls, predictions, hype trains and ad breaks the same way — and Twitch has no way to create any of those from outside its own dashboard either. Four more actions under Overlay stage one without anything really running: Show a poll, Show a prediction, Show a hype train and Show an ad break. Each works like Show a goal — the numbers come from the flow (a poll’s choices and vote counts, a prediction’s outcomes and points, a hype train’s level and progress), and the action steps aside while a real one of that kind is running on your channel.
If you cannot see anything
- A transparent label with no content may look empty. Check its text and selected variable first.
- An alert box or event stack may be idle until an event arrives. Use the matching test in its editor where available.
- Make sure the source is visible and is above any full-screen capture that would cover it.
- If hosted widgets are unavailable, this server’s operator needs to enable them.
Was this guide helpful?
Thanks. Your answer helps us decide which guides to improve.