
What you can do
Bloopbot can post to your social accounts from a flow. The usual use is a go-live announcement: the moment your stream starts, a post goes out on each network you connected, with your stream's title, its category, a picture of the stream and a link to your channel. Anything a flow can trigger can post, so a milestone or a command can too.
Each network has its own step in the Integrations group of the node library, because the networks differ in length, pictures and cost:
| Step | Text limit | Picture | Link |
|---|---|---|---|
| Post to Bluesky | 300 characters | optional | link card when there is no picture |
| Post to Mastodon | your server's limit, 500 on most | optional | Mastodon builds its own card |
| Post to X | 280, counted the way X counts | optional | X builds its own card |
| Post to Threads | 500 characters | optional | link card |
| Post to Instagram | 2,200 characters | required | not clickable in a caption |
| Post to Facebook | very long | optional | link card, or in the photo's caption |
Only X costs money to post to: see What posting to X costs. Every other network is free.
Posting to Meta's networks (Threads, Instagram and Facebook) and to X may not be available on your channel yet. If a network's card is missing from Connections, or a step says posting to it isn't available yet, What your plan includes shows what your channel holds; nothing is wrong with your flow.
Before you start
- Only the channel owner connects accounts. An editor can build and change the flows that post, but the connect and disconnect buttons are the owner's.
- You approve Bloopbot on the network's own page. Bloopbot never sees or stores a password, and never asks for an app password. What it keeps is the sign-in token the network hands back.
- A post is public. Everything Bloopbot posts is a normal public post from your own account, including the test post.
- Ten posts an hour. Bloopbot sends at most 10 posts an hour to each network for your channel, so a flow that loops by mistake can't flood your account. More in Limits and safety.
- Add a backup sign-in email. If a network stops accepting the connection, Bloopbot emails your confirmed backup sign-in email once. Without one you find out from the card and the flow's Run log.
Install the Socials pack
The Socials pack is a ready-made go-live flow for each network, so you don't build the four steps yourself. Each flow, named Post to Bluesky when you go live, Post to Mastodon when you go live and so on, does this:
- Stream starts or ends, set to Live: it starts when your stream goes online.
- A check that this stream has not already been announced on that network.
- The Post to step for the network. Its starter text is your stream's title, category and channel link, for example
Live now: Speedrunning Celeste until the PB falls (Celeste) https://www.twitch.tv/yourchannel. It attaches your stream's live picture, and where the network offers one, a link card. - Set a variable, which remembers this stream so it is announced once.
To turn one on:
- Connect the account first: open Connections, choose the network in the list on the left, and follow its section below.
- Open Flows, press Add, and add the Socials pack (you can also find it in the Marketplace). It installs every flow paused and declares the variables they use, so nothing posts until you decide.
- Open the flow for the network you connected, edit the post text if you like, and save. Keep your channel link in the text so people can reach the stream.
- In the Post to step, press Send test post (see The post step) and check the real post.
- Enable the flow. If you are already live it waits for your next stream to start.
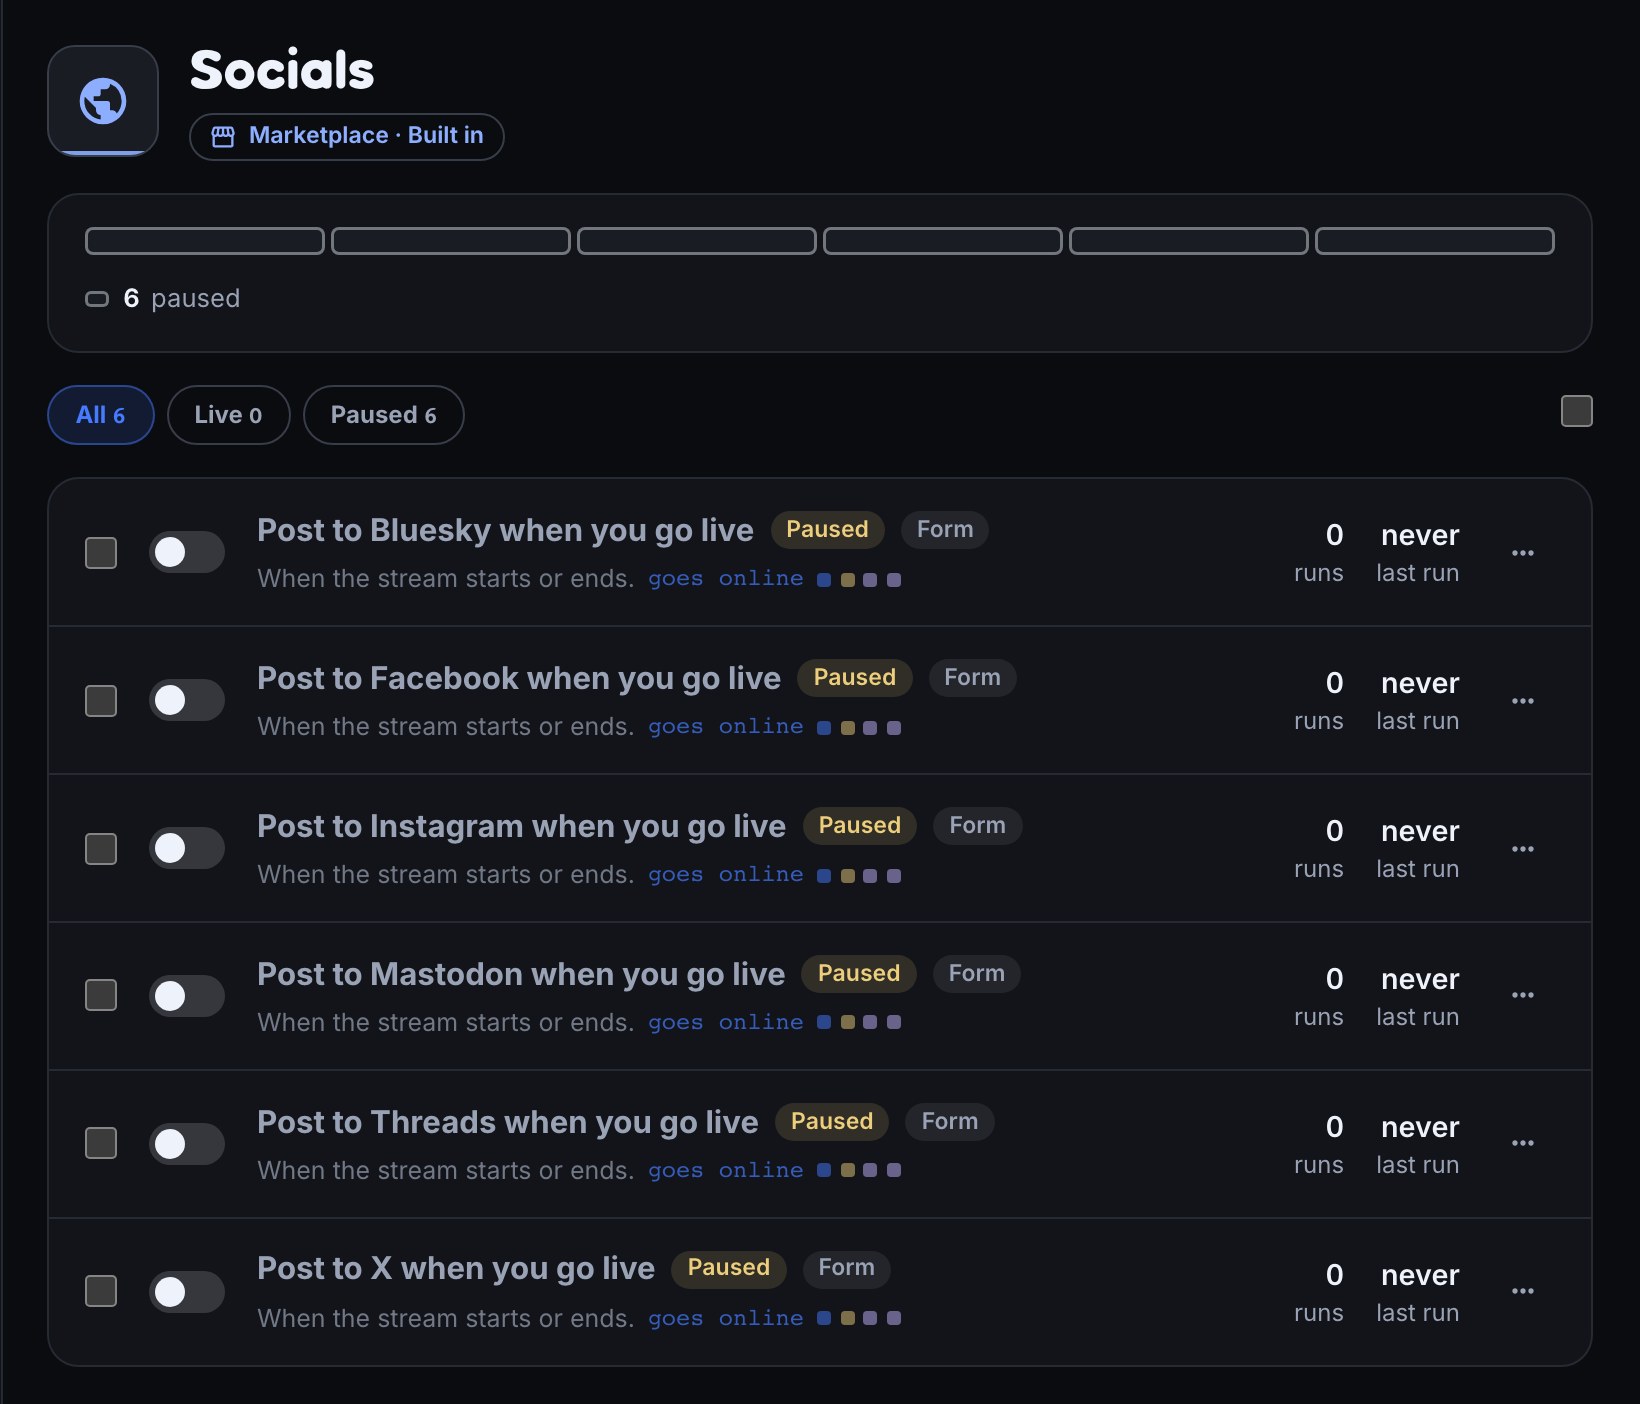
You can install the pack before you connect anything. Enabling is what needs the account: enable a flow whose network isn't connected and Bloopbot says Connect your Mastodon account on Connections before enabling this flow. (with the network's own name) and leaves it paused. Pausing is never blocked. Turn on only the networks you use; a paused flow does nothing and costs nothing.
Once for each stream. At the start of a stream the flow compares the stream's ID with the last one it announced on that network. If they differ it posts, and only after the network confirms the post does it remember the new ID. So a stream is announced once even if Twitch reports it going online again after a short disconnect, your next stream gets a fresh announcement, and a failed post leaves the ID as it was so the next go-live event can try again. Each network keeps its own memory in a channel text variable named <network>_announced_stream_id, such as bluesky_announced_stream_id, so one network being down never stops the others.
This is a best-effort guard. Two runs at the same instant, or a network that accepts a post but is slow to answer, can still produce a duplicate, so if a post reported a failure, look at the network before you retry by hand. If you delete a flow's variable, the flow can't be enabled until you declare it again under Content, Variables, as a text variable for the channel with the name Bloopbot shows.
Don't add a second go-live flow for a network that already has one from the pack: you would announce every stream twice. To announce something else, or to post from another flow, add the Post to step to that flow.
The post step
Every Post to step has the same fields, whatever the network. Add it after a trigger in any flow; for a go-live announcement start with Stream starts or ends and set When the stream goes to Live.
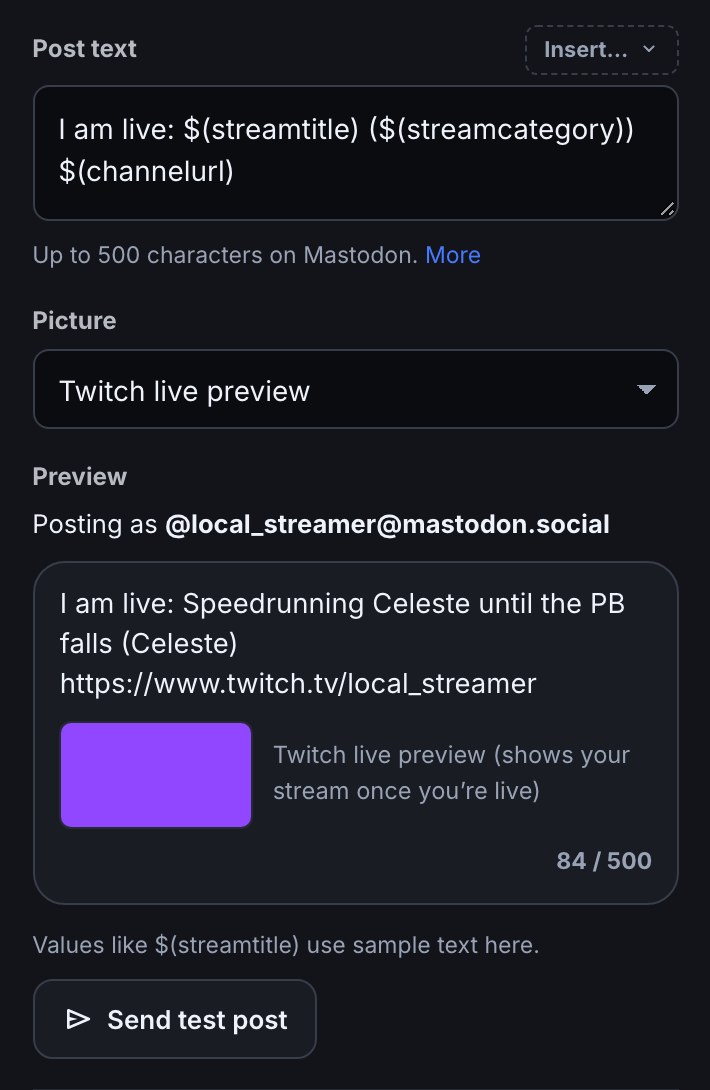
- Post text. Write the post. Choose Insert… to add values such as
$(streamtitle),$(streamcategory)and$(channelurl); they are filled in when the flow runs. Text over the network's limit is cut with … when it posts, never in the middle of a link or a character. - Picture. Choose Twitch live preview (a screenshot of your stream, the default), From Media (a picture from your Media library) or None. Instagram has no None, because it has no text-only posts. Picture description is read out to people using a screen reader.
- Show a link card, on the networks that have one, adds a preview card for Link (your channel link by default).
- Read the Preview at the bottom of the step. It shows who the post will go out as, your text with sample values, the count against the network's limit (for example 84 / 500), and the picture.
- Save the flow. A test post uses the saved step.
The live preview and the profile picture. Twitch makes your stream's live preview a few minutes after you go live. A go-live post waits up to a minute and a half for it, then uses your Twitch profile picture if Twitch still hasn't made one, and the flow's Run log says so. Only if that can't be fetched either does the post go out without a picture (or, on Instagram, fail). A test post doesn't wait: it uses the live preview if you are live, and your profile picture if you aren't.
Send a test post. Under the preview, Send test post shows a box titled Post publicly to the network, with the exact post, its count and, on X, what it will cost. Post publicly sends it for real, to your own account; Cancel sends nothing. A test post fills the stream title and category from your stream as it is right now, so when you are offline they come out blank, as in the picture below; the box says so, naming each value that is empty, and you can still post or cancel. Go live first, or trust the preview's sample values, if you want to see them. A test post is public, so delete it on the network afterwards if you don't want it to stay, and it counts toward the hourly limit. It never counts as a go-live announcement, so your next real stream still posts, and it never sends the reconnect email. The button is greyed out, with the reason beside it, until the flow is saved and the network is connected.
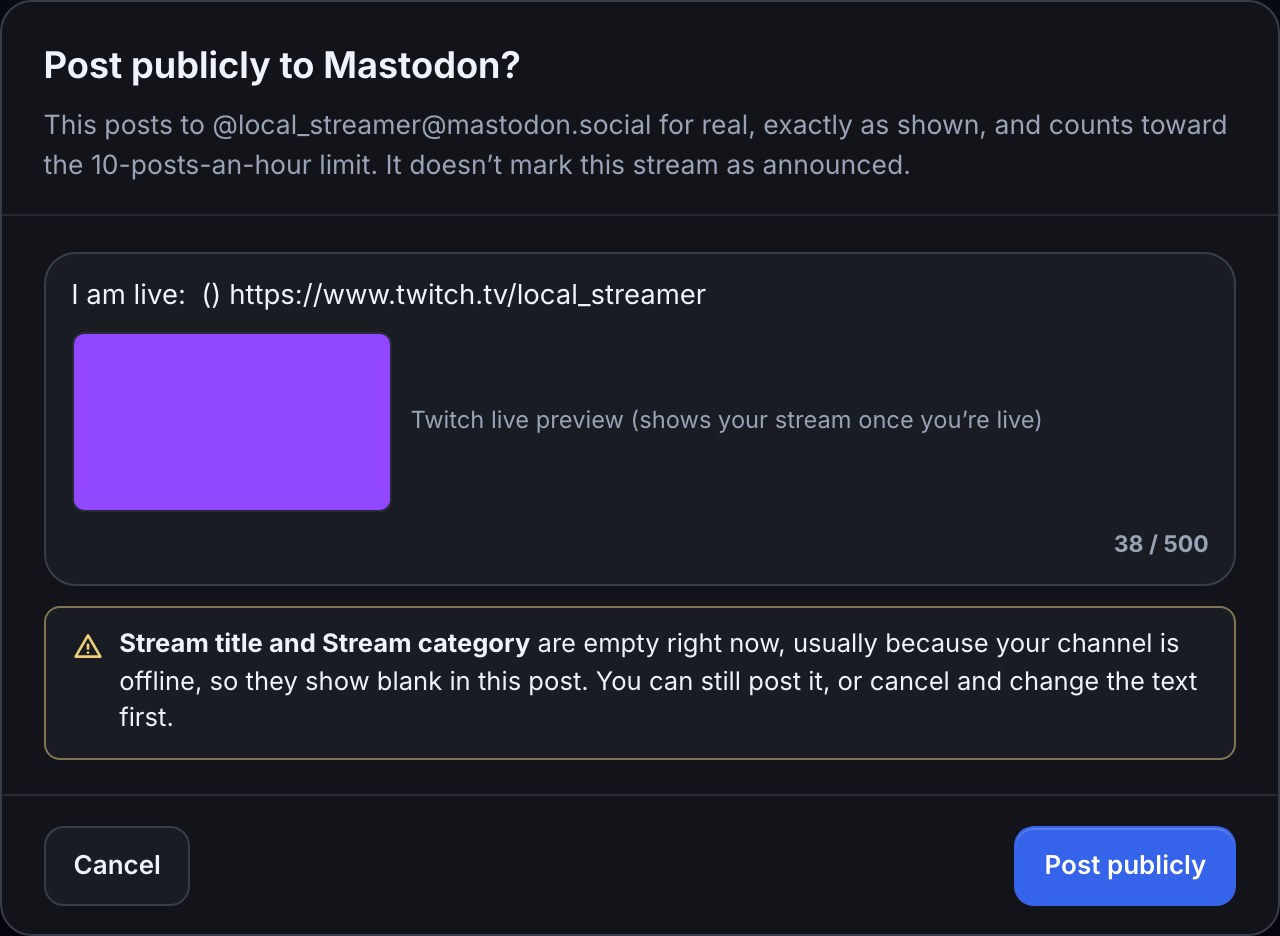
What you should see. After Post publicly, the step shows View the post with a link to it, and the post is on your profile. In a real run the flow's Run log says Posted to the network, adds a note when the text was shortened or your profile picture stood in, and later steps can use the post's ID and link.
Bluesky
You need a Bluesky account. You approve Bloopbot on Bluesky's own page.
- Open Connections and choose Bluesky in the list on the left.
- Under Bluesky handle, type your handle, for example
name.bsky.social, or your own domain if you use one. A leading@is fine. - Press Connect Bluesky. Bluesky opens and asks you to sign in and approve Bloopbot. The approval screen describes a general permission for your account; Bloopbot only uses it to create the posts your flows send and to upload their pictures.
- Approve. You come back to the Bluesky card, which shows your handle and Connected.
One Bluesky account can be connected to more than one of your channels; disconnecting it from one leaves the others connected.
Add Post to Bluesky as in The post step. The starter text is Live now: $(streamtitle) ($(streamcategory)) $(channelurl). For example, a stream titled "Celeste any% attempts" in the category "Celeste" posts:
Live now: Celeste any% attempts (Celeste) https://twitch.tv/yournamewith a screenshot of the stream under it. The link is clickable, and the picture's description is the stream title.
A Bluesky post carries one attachment, so the step offers a choice. With a picture, the picture is the attachment and your link stays clickable in the text; if the text doesn't already contain the link, Bloopbot adds it on its own line and shortens your text to make room. With Picture set to None and Show a link card on, Bloopbot shows a preview card for Link, using the page's own title, description and image; if the page can't be read the card still appears with just the link. Bloopbot converts pictures to JPEG and shrinks them to fit Bluesky's size limit; a picture that can't be prepared leaves the post going out without it, and the Run log says so.
The limit is 300 characters, an emoji counting as one. Links and #hashtags are clickable; an @name stays plain text and notifies no one. Only one picture goes with a post.
Mastodon
You need an account on a public Mastodon server, such as mastodon.social. Servers that work like Mastodon, such as GoToSocial or Pleroma, usually work too; a private or company-only server doesn't. Every post is public: there is no followers-only or unlisted option, content warning or poll.
- Open Connections and choose Mastodon.
- Under Your Mastodon server, type your server,
mastodon.social, or your full address such as@[email protected]. Bloopbot uses only the server part. - Press Connect Mastodon. Your server opens and asks you to approve Bloopbot. Check you are signed in as the account you want to post from, review the permissions and approve.
- You come back to the Mastodon card, which shows your account, for example @[email protected], and Connected.
The first time anyone connects on a server, Bloopbot introduces itself there, so that step takes a moment longer. You can start five connection attempts every ten minutes per channel.
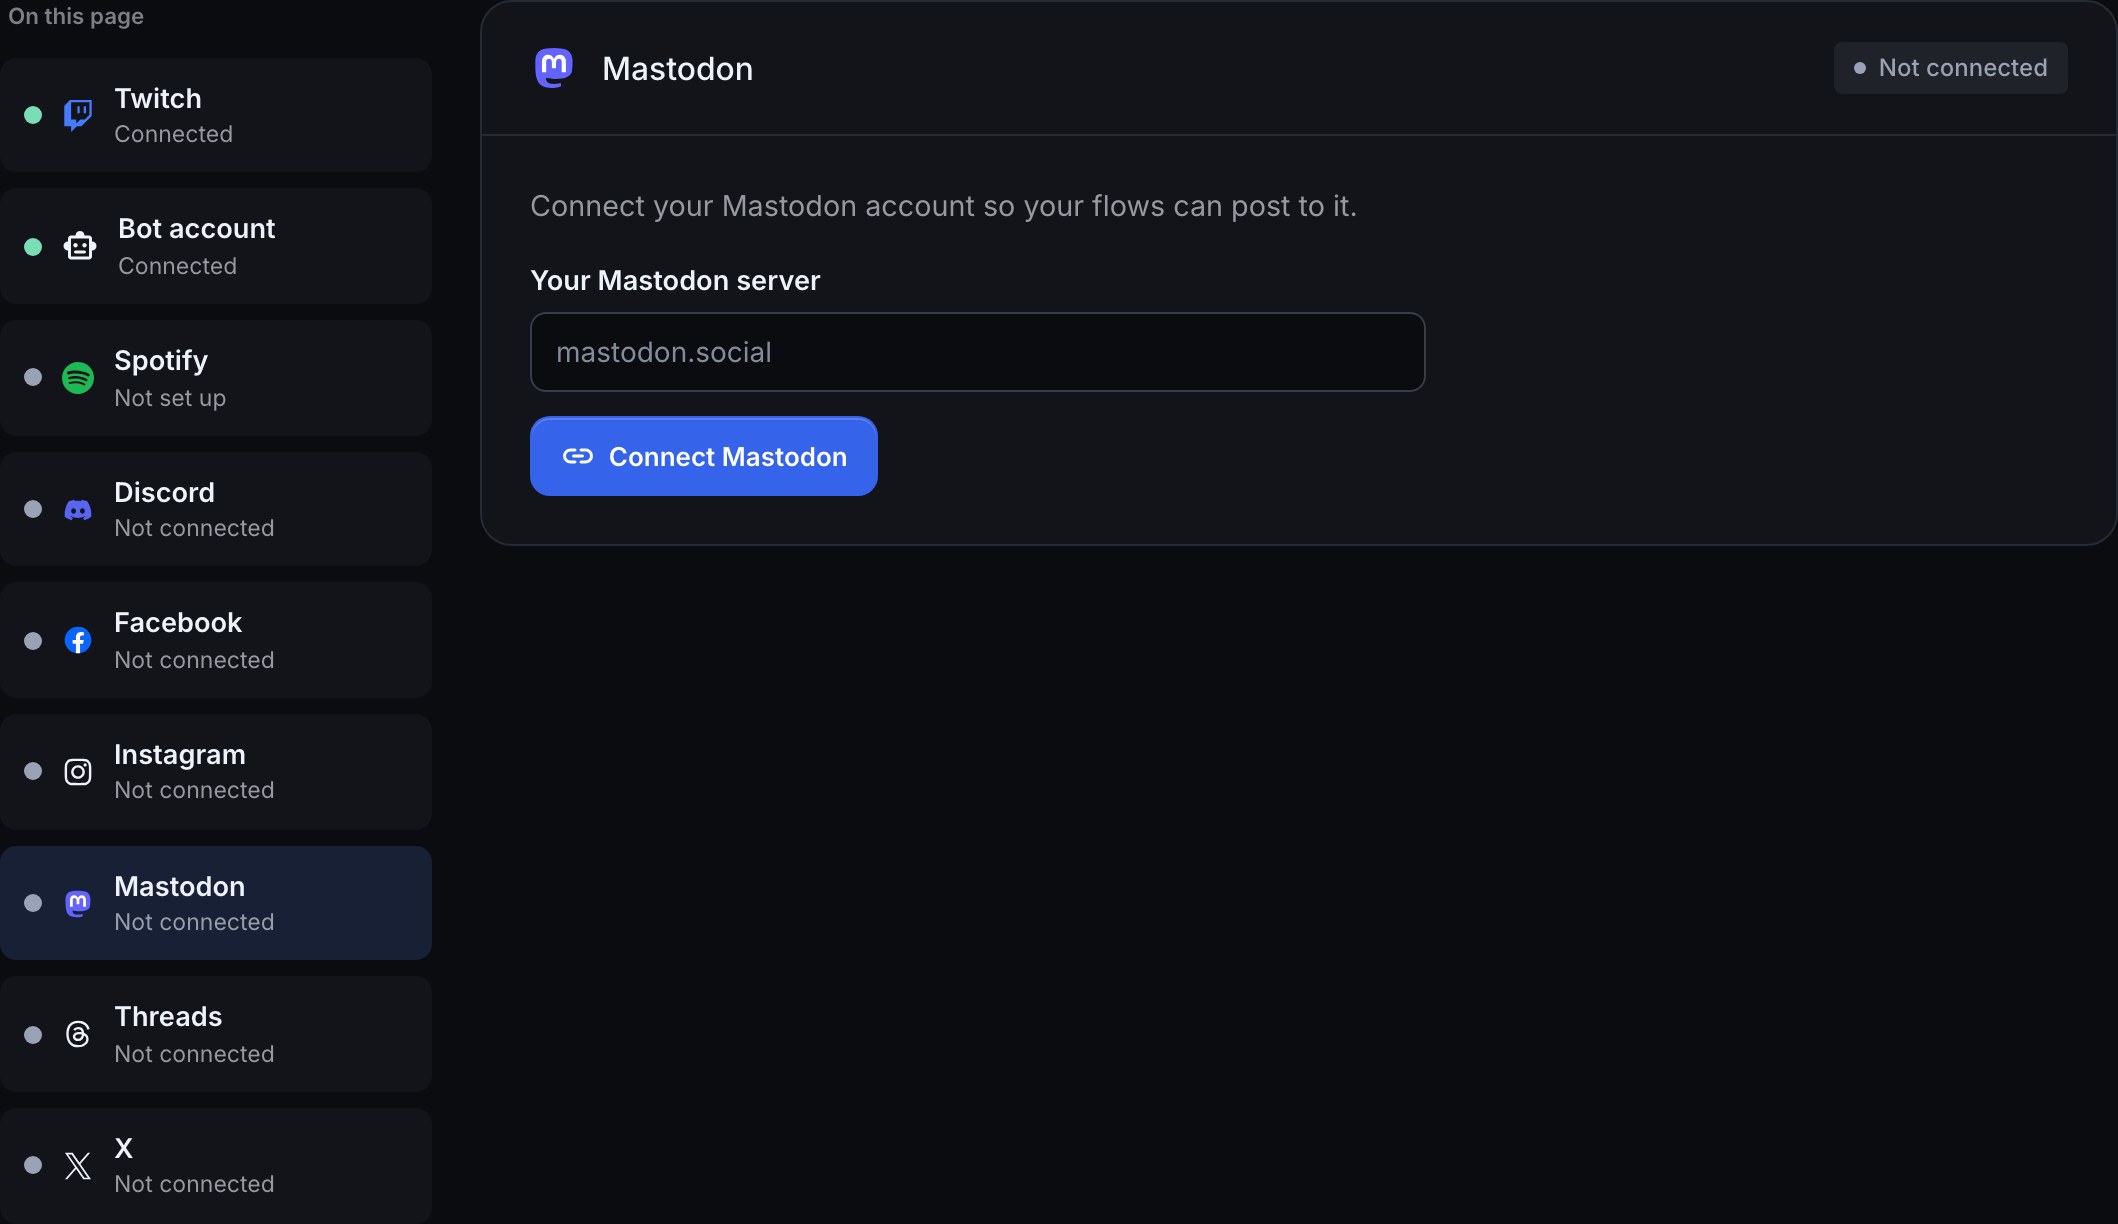
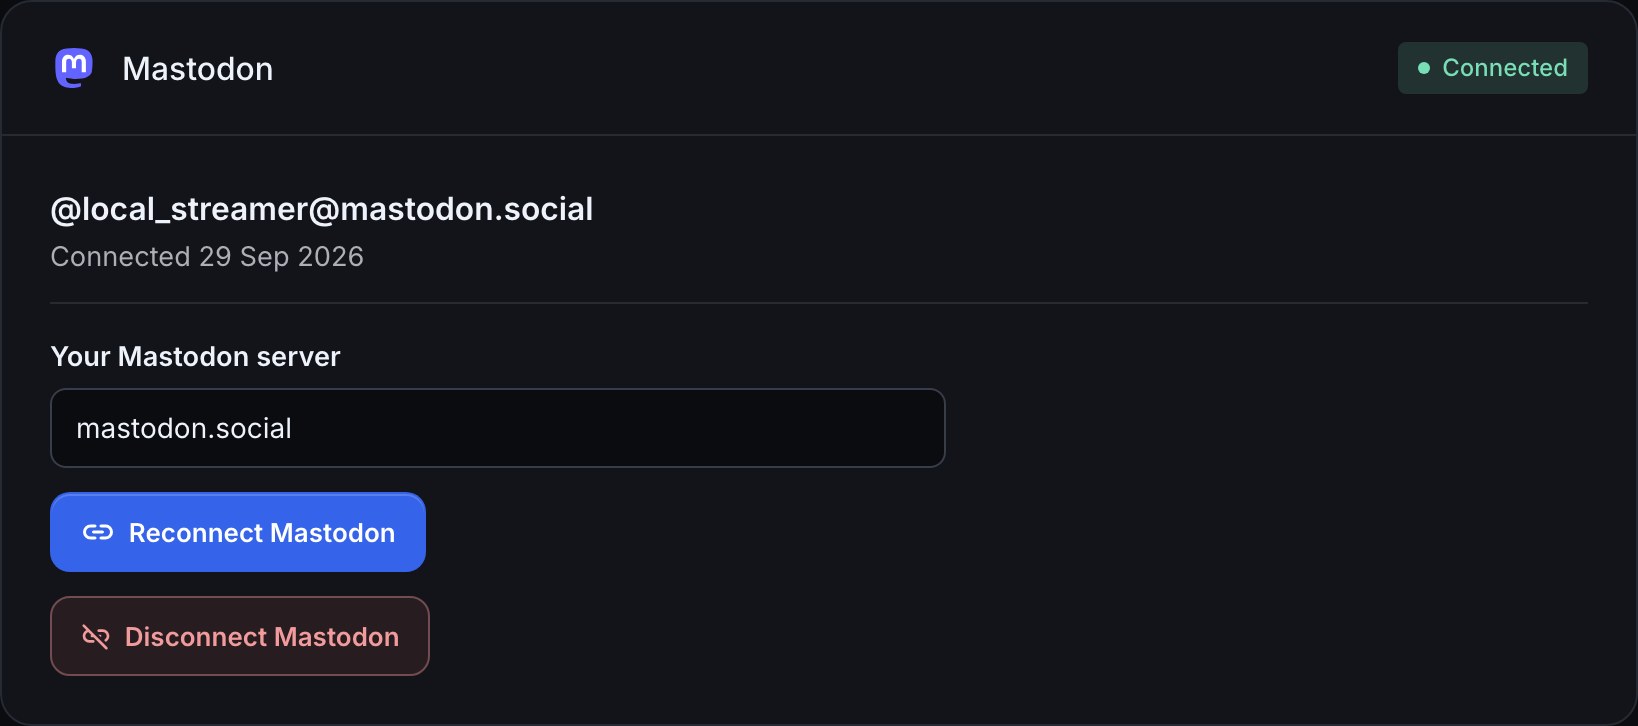
Add Post to Mastodon as in The post step. The starter text is I am live: $(streamtitle) ($(streamcategory)) $(channelurl); for a stream playing Celeste it posts I am live: Speedrunning Celeste until the PB falls (Celeste) https://www.twitch.tv/yourchannel with your stream's picture, and Mastodon adds its own preview card for the link.
- Length. Your server sets the limit; most allow 500, some more, and the step's preview uses your server's number once you are connected. Every link counts as 23 characters however long it is, and a mention of someone on another server counts as just their name.
- Pictures. One picture, converted to a JPEG no larger than 1920 by 1080 pixels and 4 MB. If your server refuses it, the whole post fails and the Run log shows your server's own words; choose None for a server that doesn't take pictures.
- Editing and deleting. Bloopbot posts. It doesn't edit or delete: do that on Mastodon.
Mastodon access doesn't run out. If you or your server take it away, for example under Preferences, Account, Authorized apps on Mastodon, the card shows Needs reconnecting.
X
X is the one network that charges for posting, and Bloopbot passes the charge on to you, so read What posting to X costs before your first post. You need to be the channel's owner to connect X and to add X balance.
- Open Connections and choose X in the list on the left.
- Press Connect X. X asks whether Bloopbot may post for you: approve everything it lists. You come back to the card, which shows your account, for example @yourname.
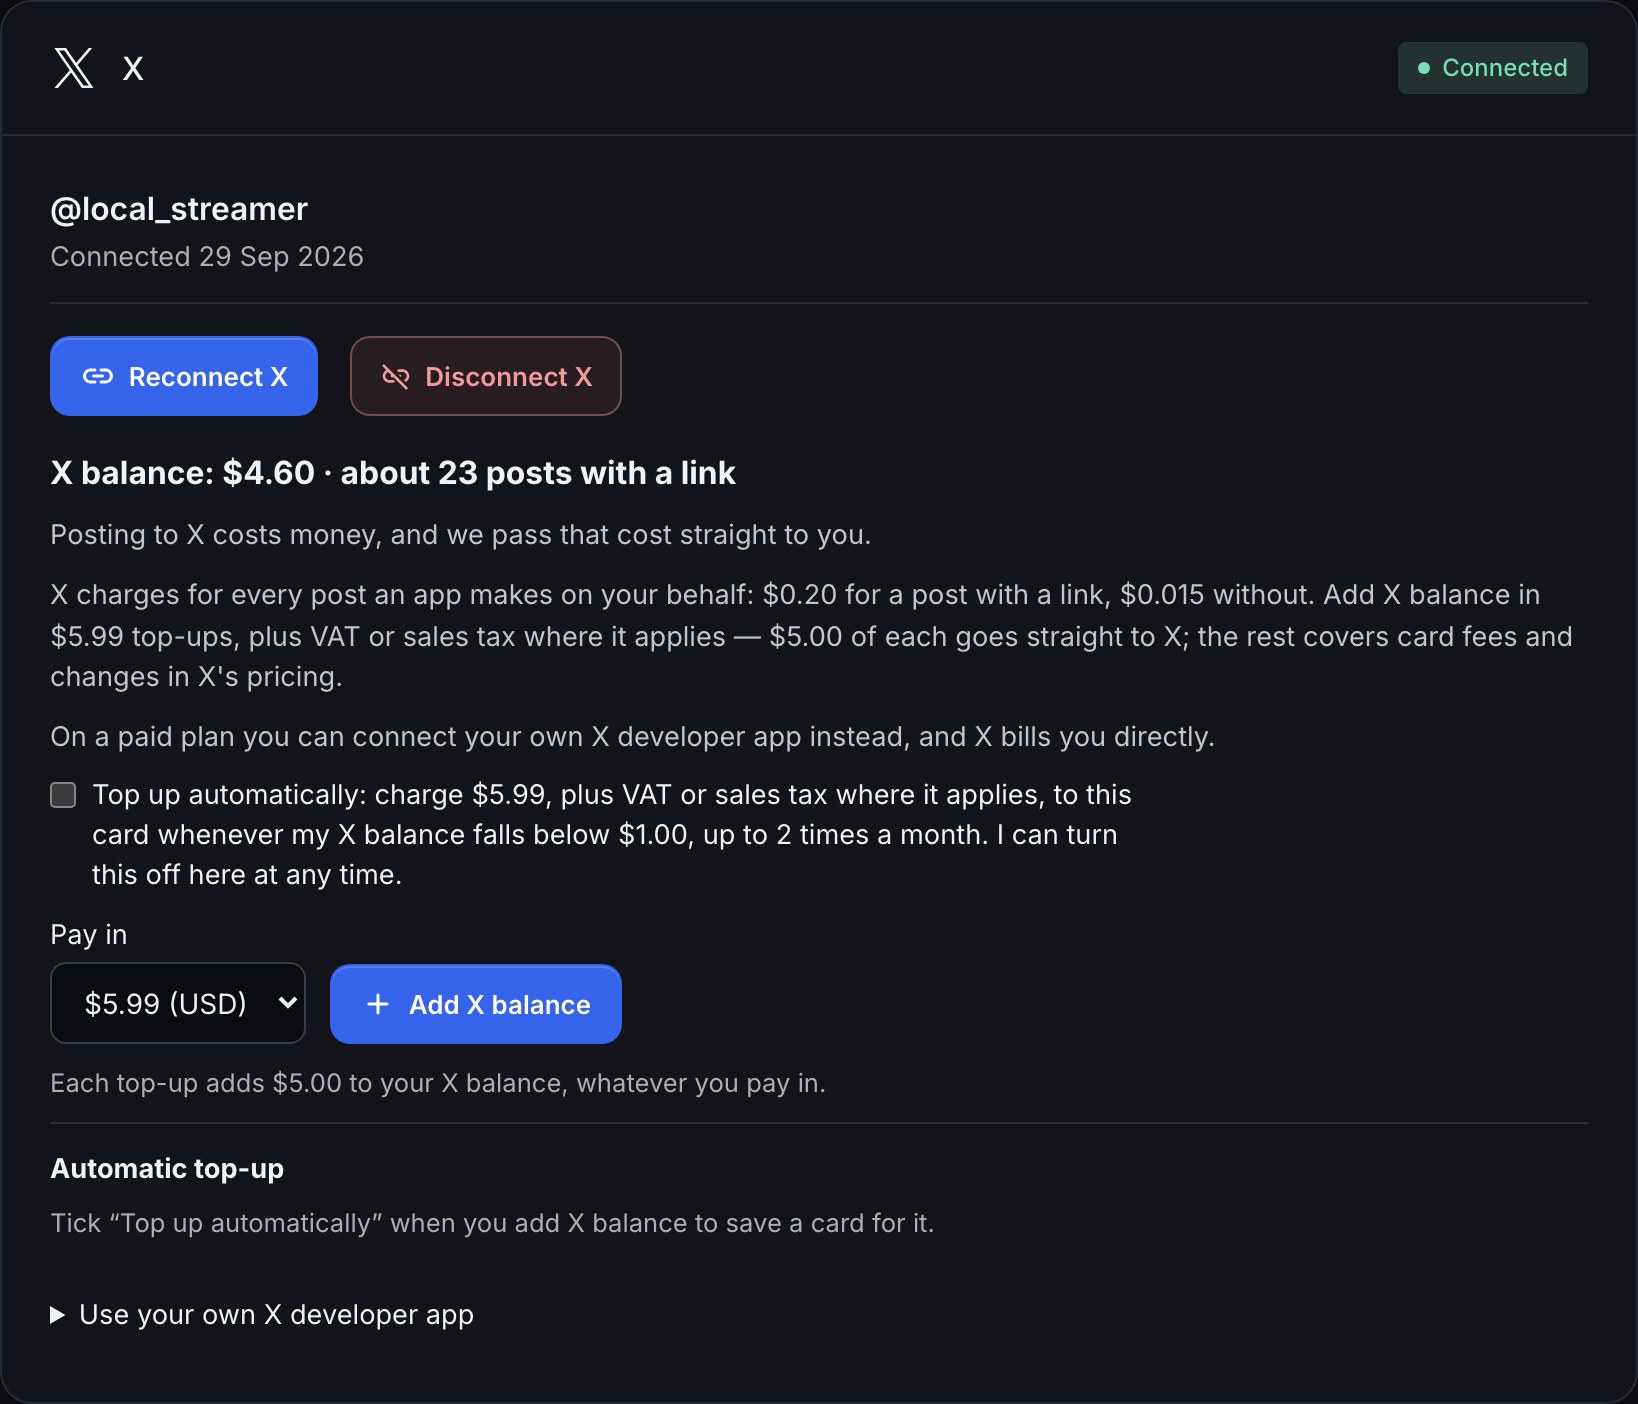
- Add X balance (Add X balance), or connect your own X developer app instead (Use your own X developer app). Posting through Bloopbot's app needs a balance.
- Add Post to X as in The post step. It starts as
Live now: $(streamtitle) ($(streamcategory)) $(channelurl).
Under Preview, Bloopbot counts the post the way X does: a link counts as 23 characters however long it is, an emoji as 2, and the limit is 280. Text over the limit is cut with … when the step runs, and a link is never cut in half. X builds its own link card from a link in your text, so the step has no link card setting. On Bloopbot's app a picture goes up without its description, because X bills the description separately; through your own X app the Picture description is set.
For example, Live now: Speedrunning Celeste until the PB falls (Celeste) https://www.twitch.tv/yourchannel with the Twitch live preview posts your title, your category and a link to your channel, with a picture of the stream, and costs $0.20 because it has a link.
What you should see: the flow's run shows Posted to X, the post appears on your X profile, and the X card's balance drops by the cost of the post. A step that fails leaves a warning on the X card and a line in the flow's Run log.
X refuses text it has already published from the same account as duplicate content, so keep $(streamtitle) in the text.
Threads
You need a Threads profile. Bloopbot posts as that profile. A post is text, and it can carry a picture or a link card for your channel page.
- Open Connections and choose Threads.
- Press Connect Threads.
- On Threads, sign in if you are asked to, review what Bloopbot asks for (to read your profile name and to publish posts for you) and approve.
- You come back to the Threads card, which shows your Threads username and the day you connected.
Bloopbot keeps your connection fresh in the background, so you don't sign in again every couple of months. If Threads doesn't let you through, the card shows Threads' own explanation of why: read it, fix that, and press Connect Threads again.
Add Post to Threads as in The post step. For example:
Live now: $(streamtitle) - playing $(streamcategory). Come hang out: $(channelurl)- 500 characters. Longer text is cut with … when it posts.
- Up to 5 links. The link card counts as one unless the same link is already in your text. A post with more than 5 links is refused, with a message in the Run log.
- A picture replaces the link card. A post with a picture shows the picture; the link card shows under text-only posts.
- 250 posts every 24 hours on your profile, set by Threads, on top of Bloopbot's 10 an hour.
You need an Instagram Business or Creator account. Instagram only lets those account types publish from apps, so a personal account can't be connected: in the Instagram app switch to a professional account in Settings, then connect again. You don't need a Facebook Page. Every Instagram post is a picture with a caption; there are no text-only posts.
- Open Connections and choose Instagram.
- Press Connect Instagram.
- On Instagram, sign in if you are asked to, review what Bloopbot asks for (to read your profile and publish posts) and approve.
- You come back to the Instagram card, which shows your username. A personal account isn't connected, and the card tells you why.
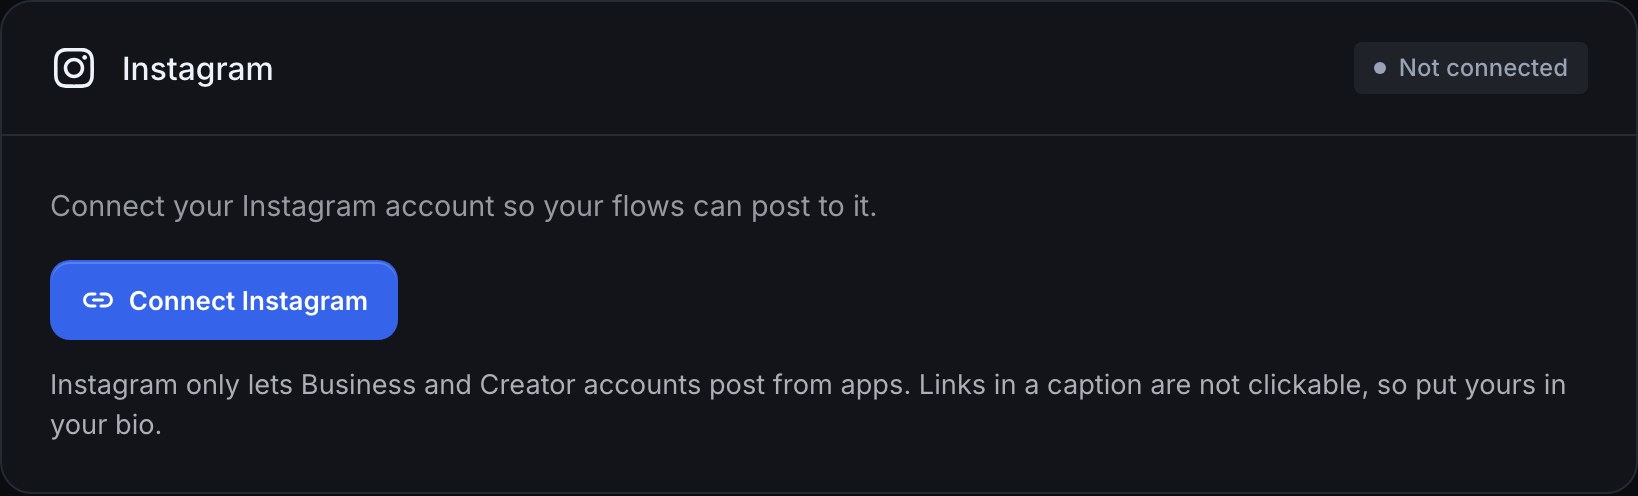
Add Post to Instagram as in The post step. The Post text becomes the caption, and Picture is Twitch live preview or From Media. For example:
Live now on Twitch: $(streamtitle) - playing $(streamcategory). Link in bio!- Links. Instagram doesn't make a link in a caption clickable, so put your Twitch link in your Instagram bio and say "Link in bio", as the starter text does. That is why there is no link card.
- Pictures. Bloopbot turns the picture into a JPEG and sizes it, so a PNG from your Media library works. Instagram only accepts pictures no wider than 1.91 to 1 and no taller than 4 to 5. The Twitch live preview fits; for your own picture, choose one in between, such as a square. Instagram takes a few seconds to process the picture, so a test post can take a moment.
- 2,200 characters in a caption, and up to 30 hashtags: longer text is cut with …, and hashtags past 30 lose their
#. - 100 posts every 24 hours through apps, set by Instagram, on top of Bloopbot's 10 an hour.
Bloopbot posts to a Facebook Page, never to a personal profile, because Facebook doesn't let apps post to profiles. You need a Page you manage, with a role that lets you create posts (an admin, or an editor who can create content). One Page is connected at a time. A post is text, a link that shows a preview, and optionally a photo.
- Open Connections and choose Facebook.
- Press Connect Facebook.
- On Facebook, sign in if you are asked to and review what Bloopbot asks for: to see your Pages and to publish posts to them. Choose the Pages you are allowing Bloopbot to use.
- If you allowed more than one Page, Bloopbot asks Which Facebook Page should Bloopbot post to? Choose one and press Connect this Page. With a single Page it connects straight away.
- You come back to the Facebook card, which shows the Page you chose.
To post to a different Page later, press Reconnect Facebook and pick another. A Page connection doesn't need renewing.
Add Post to Facebook as in The post step. For example:
Live now: $(streamtitle) - playing $(streamcategory). Come hang out: $(channelurl)Leave Show a link card on to add a link preview under a text post. On a post with a picture Facebook has no card, so Bloopbot adds the link to the photo's caption. A test post is a real, public post on your Page: you can delete it from the Page in Facebook.
What posting to X costs
Posting to X costs money, and we pass that cost straight to you.
X charges for every post an app makes on your behalf: $0.20 for a post with a link, $0.015 without. Add X balance in $5.99 top-ups, plus VAT or sales tax where it applies — $5.00 of each goes straight to X; the rest covers card fees and changes in X's pricing.
On a paid plan you can connect your own X developer app instead, and X bills you directly.
Your channel holds an X balance in money, shown on the X card as X balance: $4.60 · about 23 posts with a link, or X balance: $0.00 · add balance to post to X when nothing is left. Each post that X accepts takes its charge off the balance. A post that fails costs nothing, and a test post that goes out is charged like any other. The balance never expires. A post with a link is any post with an address in it, and a dotted word such as twitch.tv/yourname counts as one, so keep the text free of dotted words if the plain price matters.
Bloopbot holds a post's charge just before it sends the post and takes it once X accepts the post, so two flows can never spend the same last cents.
Tax. The top-up price is before tax. Where VAT or sales tax applies, Stripe adds it on top and shows it on its own line before you pay, and you can add a tax ID there. It never comes out of the $5.00 that goes to X.
Add X balance
Only the channel's owner can add X balance. It is a one-off payment through Stripe's secure checkout page, and you need no subscription: a channel on Free can do it.
- Open Connections and choose X.
- Under Pay in, choose the currency you want to pay in, then press Add X balance. You go to Stripe's checkout page.
- Check the price, shown in your currency: $5.99 in dollars, £4.79 in pounds, or 5.49 euros. Each top-up adds $5.00 to your balance whatever you pay in, and whatever the tax.
- Pay. You come back to Connections, and the balance updates within a few seconds of Stripe confirming the payment.
If Stripe refunds a top-up, the part of it you haven't spent comes off your balance, and the tax on it is refunded with it. Spending uses your oldest top-up first, so refunding an old top-up that is already spent takes nothing back from newer ones.
Buying X balance may not be available on your channel yet, because it depends on posting through Bloopbot's X app being available. Until it is, the card says so, offers no Add X balance, and keeps any balance you already hold.
Top up automatically
Turn this on if you would rather not watch the balance.
- On the X card, tick Top up automatically before you press Add X balance. The text beside it names the amount, the $1.00 trigger and the monthly limit you agree to.
- Pay as usual. Your card and the billing address you gave are saved with Stripe for later top-ups, and the card shows the card's brand and last four digits under Automatic top-up.
- When your balance falls below $1.00, Bloopbot charges one top-up to that card, plus VAT or sales tax where it applies, worked out from your saved billing address. It never charges more than twice in a calendar month unless you raise Most per month, from 1 to 10, and press Save.
Stripe sends its own receipt for every automatic top-up. To stop them, untick Top up automatically under Automatic top-up and press Save; tick it again whenever a card is saved.
If a charge doesn't go through, because the card is declined or has expired, your bank asks you to confirm it, or Bloopbot has no billing address to work out tax from, automatic top-up turns itself off and the X card says why. Bloopbot also sends one email, Your X top-up failed — update your card, when your channel has a confirmed backup email. Add X balance yourself with a working card, and tick the box again to turn it back on.
Use your own X developer app
On Plus or Pro you can post through your own X developer app instead of Bloopbot's. X then bills you directly for every post, so Bloopbot takes nothing off your X balance and the card shows Posting through your own X app — X bills you directly. Only the ten-posts-an-hour limit and X's own limits apply.
You need a Plus or Pro plan (a Free channel adds X balance and posts through Bloopbot's app instead), and an X developer account with an app on X's Pay-per-use plan and credit added to it in X's developer console.
- Open console.x.com signed in with the X account that owns your developer app, and create an app. Add credit to it under Pay-per-use.
- In the app's User authentication settings, choose Web App, Automated App or Bot, give it Read and write permissions, and add the callback URI shown on Bloopbot's X card under Use your own X developer app. Copy it with the button beside it: it must match exactly. Bloopbot asks for these permissions:
tweet.read,tweet.write,users.read,offline.accessandmedia.write. - Open the app's Keys and tokens and copy the OAuth 2.0 Client ID and Client Secret.
- On Bloopbot's Connections page, open the X card, then Use your own X developer app. Paste both and press Save your X app.
- Press Connect X. X asks whether your app may post for you: approve everything.
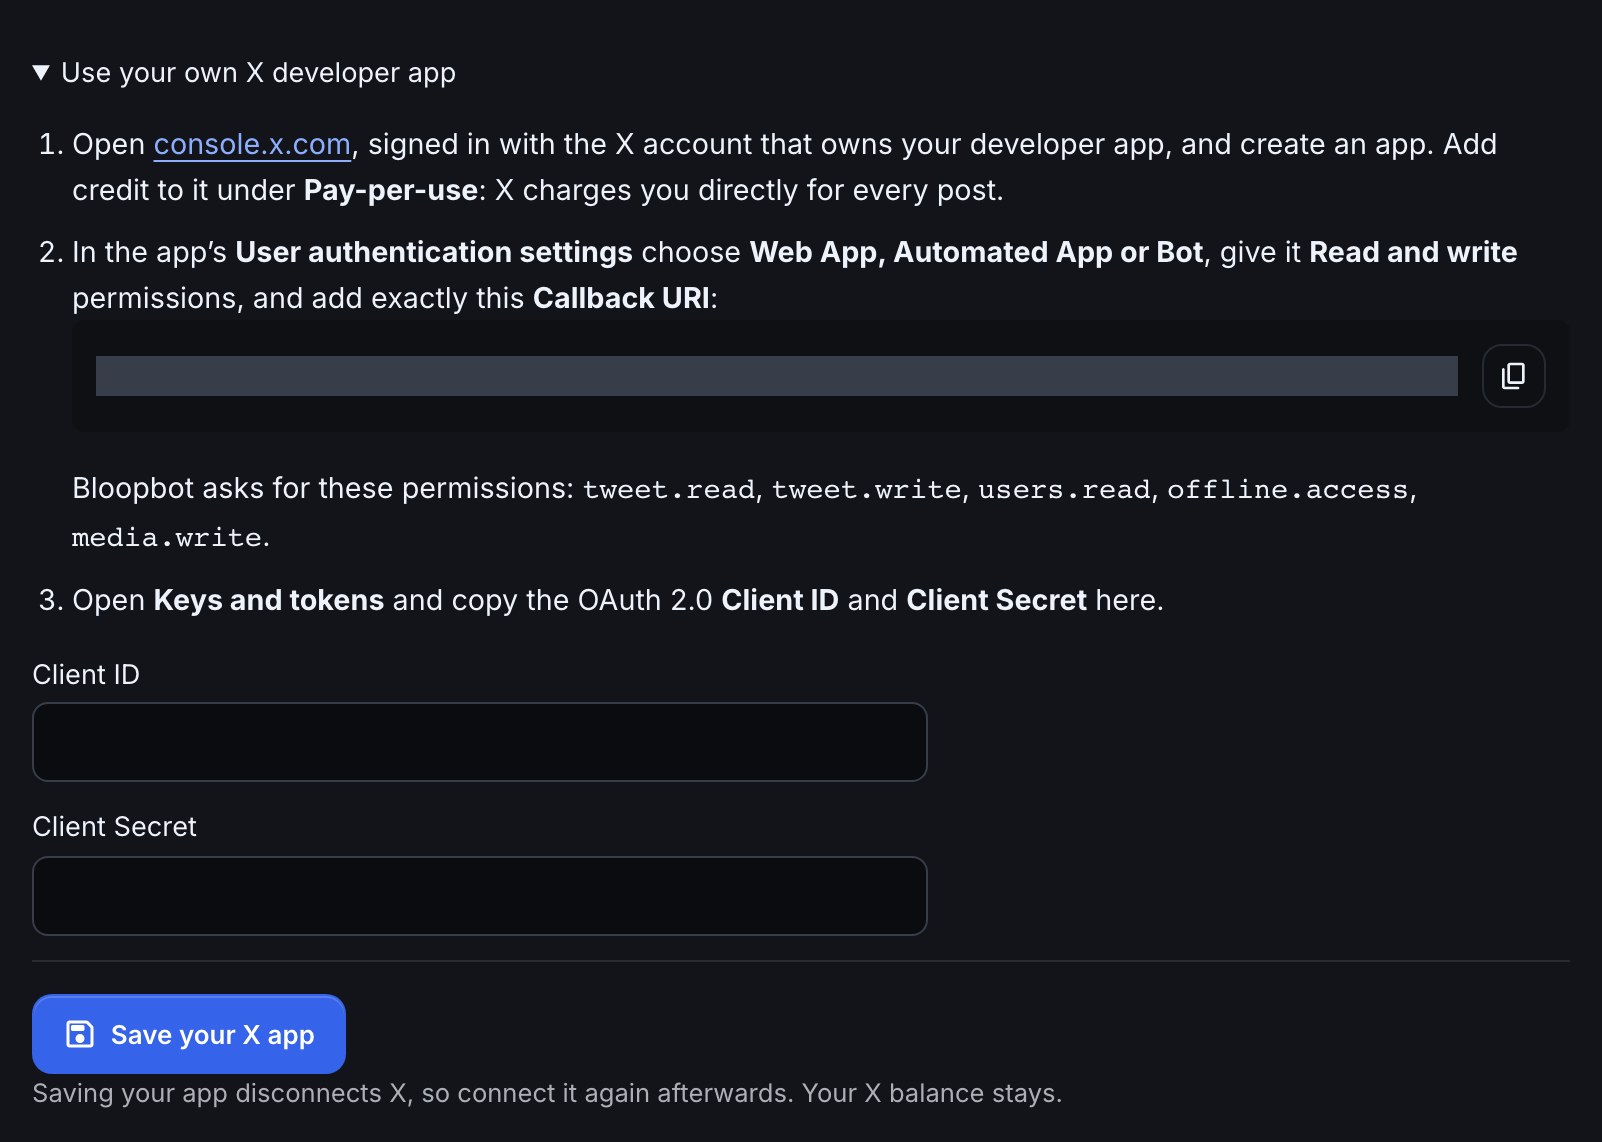
What you should see: the X card says Posting through your own X app — X bills you directly., shows your Client ID (never the secret) and your account. Post to X steps now post through your app, and their test-post box says nothing about a charge.
Saving your app, or removing it, disconnects X, because a connection belongs to one app: connect again afterwards. Your X balance stays, and the card reminds you it is there if you switch back. To go back to Bloopbot's app, open Change app, press Remove your X app and confirm, then Connect X.
If your plan ends and your channel returns to Free, posting through your own app stops, and the X card says why. Bloopbot doesn't switch you to its own app without asking: upgrade to keep posting through your app, or remove it and connect X again to post through Bloopbot's app with an X balance.
Limits and safety
- 10 posts an hour per network. Bloopbot sends at most 10 posts an hour to each network for your channel, test posts included, whichever flows they come from. The eleventh fails that step with Not posted: Bloopbot sends at most 10 posts an hour to Bluesky for your channel. The next one can go in about 12 minutes. (with the network's name and the real wait); the step's error path runs, nothing is posted, and the card shows a warning. Look for a flow that posts more often than you meant.
- Once for each stream. The pack's go-live flows announce a stream once per network. See Install the Socials pack.
- Public posts. Every post, test posts included, is public and appears from your own account. Bloopbot doesn't edit or delete posts.
- Your account, your permissions. You can remove Bloopbot's access at any time, from the network's own settings or with Disconnect on the card. Disconnect forgets the account on Bloopbot's side and, where the network allows it, tells the network to cancel Bloopbot's access; a flow that posts there then fails at that step until you connect again.
- Each network's own limits apply as well, such as Threads' 250 posts every 24 hours and Instagram's 100.
Troubleshooting
- The card says Needs reconnecting. The network stopped accepting the connection, for example because you removed Bloopbot in its settings, changed your password or lost your role on the Page. Posts to that network are paused. Press Reconnect on the card (Reconnect Bluesky, Reconnect X and so on; a Mastodon server or Bluesky handle is already filled in) and approve again; your flows keep working without changes. If your go-live post was the one that first failed, Bloopbot sends one email, needs reconnecting, to your confirmed backup sign-in email, and no more until you reconnect. Without a backup email the card and the Run log are how you find out.
- A card says a post did not go through. The last post to the network did not go through is followed by the network's own reason. It clears itself on the next successful post. The same line is in the flow's Run log.
- No X balance left — add balance on Connections. The post was not sent and nothing was charged. Add X balance, or turn on automatic top-up. If a channel has its own X app connected, this message doesn't apply.
- Posting to X is temporarily unavailable. The problem is on Bloopbot's side, not yours. The post was not charged and there is nothing to fix on your channel. Try again later.
- Posting to X through Bloopbot's app is not available yet. The card says this, and offers no Add X balance, when your channel can't yet post to X through Bloopbot's app. On a paid plan you can use your own X app meanwhile.
- I paid and my balance did not change. It updates when Stripe confirms the payment, usually within seconds. Reload Connections. Only the channel's owner sees the top-up buttons.
- Automatic top-up switched itself off. The X card shows the reason. Fix the card, add balance by hand and tick the box again. If it says We need your billing address to add tax, add balance once from the X card and fill in the address on Stripe's page; that saves it.
- The balance line says about 0 posts with a link, but I have some balance. A post with a link costs $0.20, so below that the balance still covers posts without a link.
- X says your own app is out of credit, or can't post. Your X app is out of credit — top it up in X's developer console means X refused because your developer account has no credit left; nothing was sent. The connection needs the tweet.write permission means set your app's permissions to Read and write in X's console and press Reconnect X (pictures also need
media.write). If X shows an error before it asks you to approve, or says the callback URL doesn't match, the callback URI in your X app must be exactly the one on the card, withhttps://and no trailing slash. If X didn't accept your Client ID and Client Secret, copy them again from Keys and tokens (the OAuth 2.0 ones, not the API key and secret) and save the app again. If the app isn't set up for posting, put it on Pay-per-use in a production environment in the developer console. - The card says your plan no longer includes your own X app. Upgrade to use it again, or remove your app and connect X through Bloopbot's app.
- X refused the post as duplicate content. X doesn't let an account post the same text twice. Include something that changes, such as
$(streamtitle). - Instagram connects nothing and mentions a Business or Creator account. You connected a personal account. In the Instagram app switch to a professional account, then press Connect Instagram again.
- Instagram needs a picture. The step's Picture is set to something that failed to load, or the Media picture was deleted. Choose the Twitch live preview or another picture.
- Facebook says you have no Page you can post to. Only Pages where you can create posts are listed, and only those you allowed on Facebook's screen. A Page you only have an analyst role on isn't enough: ask a Page admin for a role that can create content, then press Reconnect Facebook and select the Page.
- Mastodon could not be connected. The card says this, and adds why when your server told Bloopbot, for example That server is not a public Mastodon server. Check the spelling of the server, that it is open to the public and that it is a Mastodon-compatible server, then try again. If you started five attempts in ten minutes, wait a few minutes. If it fails after you approved, choose Connect Mastodon again and approve every permission; your server may have removed Bloopbot's app since the last time.
- Bluesky asks for a handle and says it can't start. Type the full handle, such as
name.bsky.social. A bare name or a web address won't work. If Bluesky opens but the connection doesn't finish, try Connect Bluesky again from the card in the same browser window, and stay signed in to Bloopbot while you approve: an attempt expires after ten minutes. - The post has the wrong picture, or my profile picture. The Twitch live preview only exists a few minutes after you go live. A go-live post waits up to a minute and a half, then uses your Twitch profile picture and says so in the Run log; a test post uses your profile picture straight away unless you are live. Choose From Media for a picture you control.
- The post is cut short. It was over the network's limit. The preview shows the count; shorten the text.
- A post said the network could not be reached. The network was slow or down. The next run tries again; use Send test post to check once it is back. If the network refused the post, the Run log carries its reason: shorten the text or use a different picture.
- Send test post is greyed out. Save the flow first, and connect the network on Connections: the reason is written beside the button.
- My test post has an empty title, like "I am live: ()". A test post uses your stream as it is right now, and an offline channel has no title or category yet. Go live and send the test again, or check the wording in the preview, which uses sample values.
- A test post went out and I didn't want it. A test post is a real, public post. Delete it on the network. It isn't counted as your go-live announcement, so your next stream is still announced.
- A stream was announced twice. Check that only one flow posts to that network when you go live, and that no second copy of the go-live flow is enabled.
- Nothing was posted at the start of a stream. Open the flow's Run log. A run that stopped at the check means that stream had already been announced on that network; a run that stopped at the post shows the network's reason. Check that the flow is enabled and the account is connected.
- You can't find a network's card or step. It may not be available on your channel yet. See What your plan includes.
Was this guide helpful?
Thanks. Your answer helps us decide which guides to improve.