
What a data wire is
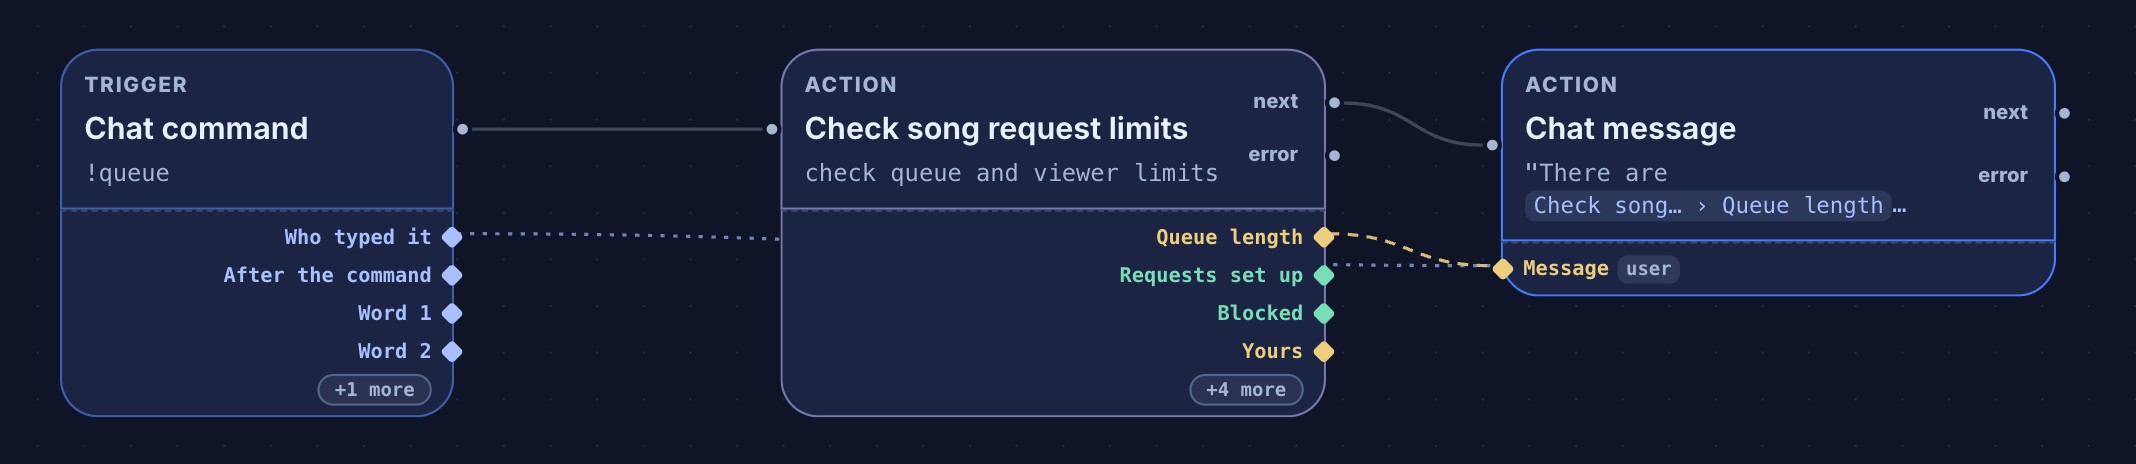
Most steps hand something on when they run: Check song request limits hands on how many songs are waiting, Find a song hands on the track it settled on, a trigger hands on who started the flow. On the canvas those values sit as small dots, called ports, in a tray under each card: what a step hands on down the right of its tray, and the fields that read a value down the left.
A data wire is the dashed line from one step’s value to the field that uses it. It is drawn from what the field already says: a wire and the $(from.…) text it stands for are the same thing, so a flow you built before wires existed shows its wires the moment you open it, and nothing about how it runs has changed. The colour tells you the kind of value — blue for text, amber for a number, green for a yes/no, lavender for a list.
Before you start
- Open the flow and choose Canvas in the top bar. The Simple view shows the same fields as a form, without ports or wires.
- The step whose value you want must run before the step that uses it — connected ahead of it on the flow’s path. A value from a step further along has not been made yet.
- The Insert… menu beside a field still works and is the keyboard route: choosing a step’s value there draws the same wire.
1. Draw a wire
- Find the value on the right of the first step’s tray — Queue length on Check song request limits, for example. Hover a value to see the name it goes by in a field, such as
queueLength. Up to four values are shown; the rest fold into +N. Hovering it lists them, and pressing it shows them all, each with its own dot; press − to fold them away again. - Press on the value’s dot and drag. Drop it on a field’s dot on the left of another step’s tray to use it in that field.
- Or drop it anywhere on the other step’s card. A small picker asks Where should Chat message use Songs this viewer has queued? and lists that step’s fields. Pick one. A field that cannot take this kind of value is greyed out, with the reason beside it.
- Press Save.
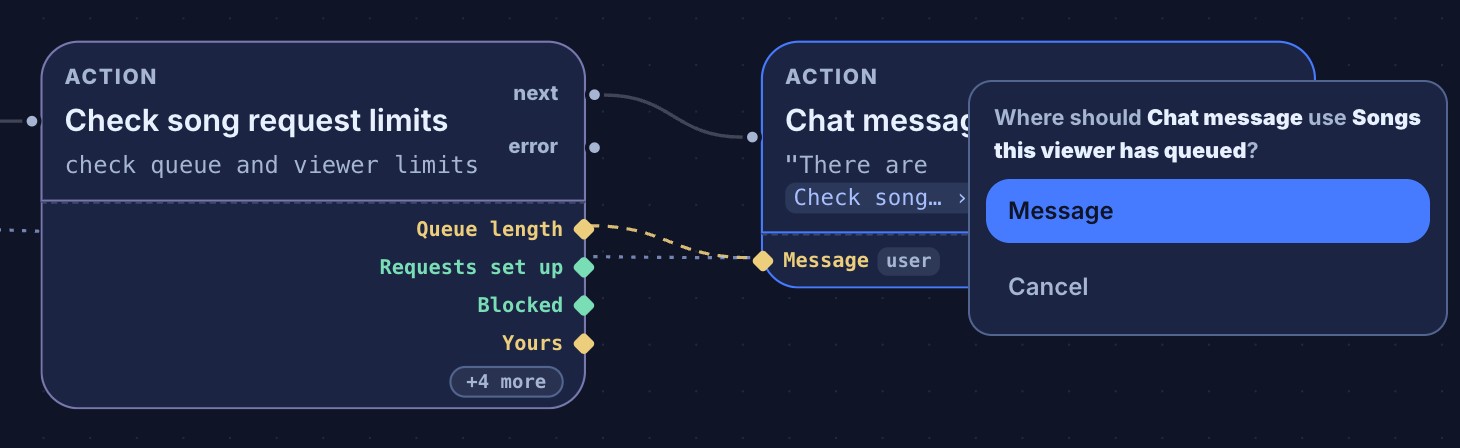
A value folded into +N gets its dot back when you press +N. The field’s Insert… menu reaches it too; the wire appears once the value is in the field.
2. Words and values in one field
A field can mix your own words with values, such as There are $(from.queue.queueLength) songs waiting, $(user). On the card each value shows as a small chip that names the step and the value the way its tray does — Check song… › Queue length — and every wire into the field lands on the same dot. One field can take as many wires as you like.
Dropping a wire on a field that already has words adds the value at the end, where you can move it as you type. Dropping it on a field that holds a single value replaces that value. Either way it is one step for Undo.
3. Trigger words, variables and loop values
Not every value comes from a step. Values the trigger gives you, such as $(user) or $(query), your own variables ($(var.…)) and the current item of a For each loop show as small badges next to the field’s dot instead of as permanent lines, so a busy flow stays readable.
Select a step to draw the wires behind its badges — the dotted line from the trigger in the first picture is one. To see every wire in the flow at once, press Show all data wires, the ⋯ button in the canvas toolbar beside Fit to view; press it again to go back.
4. Remove a wire
- Click the wire. It turns to the highlight colour and a small × appears on it.
- Press the × (its label is Remove this data wire) or the Delete key.
Removing a wire takes that value out of the field and leaves the rest of the field’s words alone. Undo puts it back. A loop wire stands for every loop value the field reads, so it is removed by editing the field instead.
Red wires: a value that is not there yet
A wire drawn in red reads a step that has not run by the time the reading step runs. That value would always be empty, so Bloopbot refuses to save the flow and says what to change, in words like: “$(from.queue.queueLength) is always empty here: Check song request limits hasn’t run by the time Chat message runs. Connect Chat message after Check song request limits.”
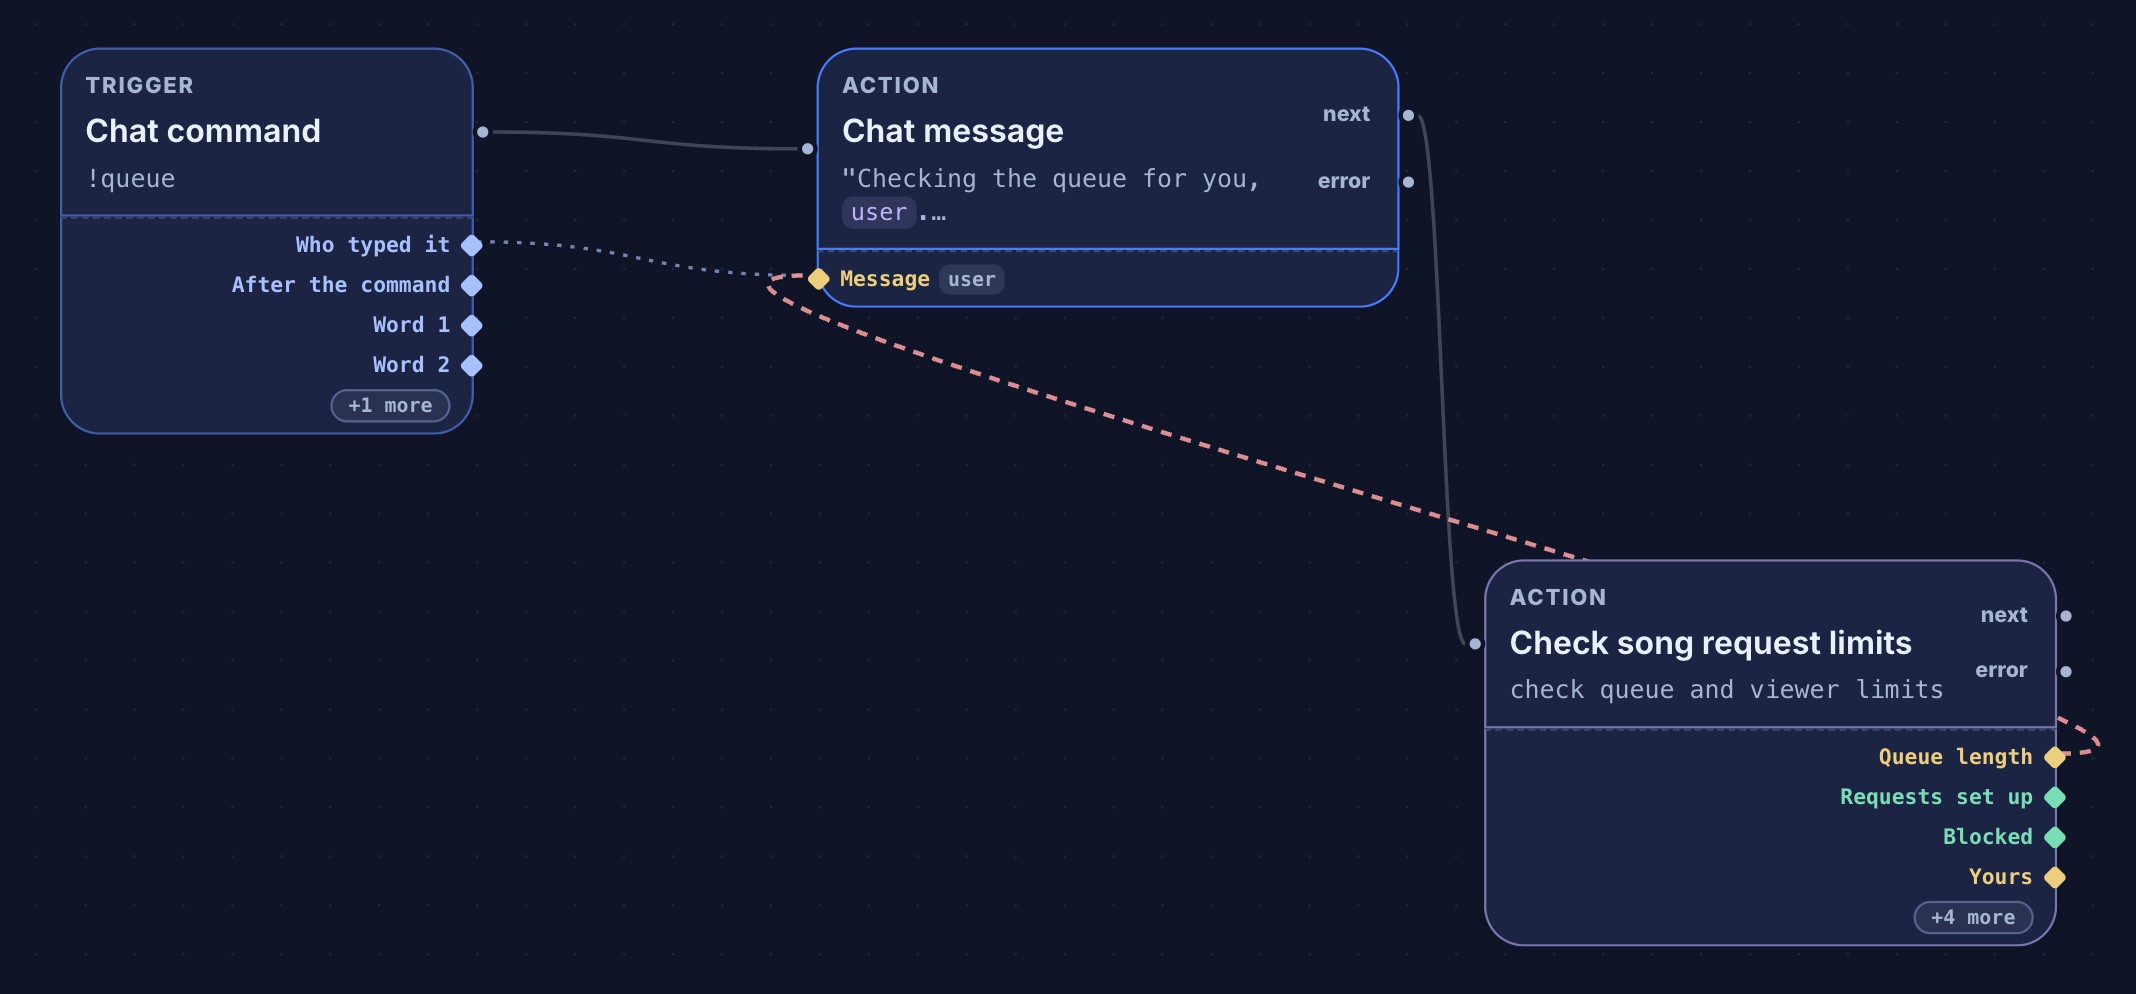
- Look at where the red wire starts: that step needs to come first.
- Reconnect the flow so the reading step comes after it, or take the value out of the field and use one that exists at that point.
- Save again. The wire turns back to its value’s colour.
A flow saved before this check existed keeps running as it always did: the value simply comes through empty. Flows → Needs attention lists it as reads a value before it’s set, with the same message, and you see the red wire when you open it. Fix it the same way, then save.
A worked example: a !queue command
A command that tells the viewer how many songs are waiting, without typing a single token by hand.
- Open Flows → + New flow → Start blank, add a Chat command trigger and set its command to
queue. - Add Check song request limits after the trigger. Leave The song to look up blank: this command only needs the queue.
- Add a Chat message after it and type
There are songs waiting, $(user).— with a gap where the number goes. - Drag Queue length from the check’s tray onto the Chat message card and pick Message. The value lands at the end of the message as
$(from.queue.queueLength): select the Chat message and move it into the gap in the Message box. - Press Save, then Test fire, and expand the Run log. The test is simulated and does not send a Twitch message.
- Switch the flow on and type
!queuein your Twitch chat to see the real reply.
What you should see
- An amber dashed wire from Queue length to the Chat message’s Message dot, and a chip in the message on the card.
- In the Run log, the simulated message with the number filled in.
- In chat, with three songs waiting and PixelPal asking:
There are 3 songs waiting, PixelPal.
Troubleshooting
- The drop did nothing and a message appeared. The field wants a different kind of value. Read the message, then pick another field or another value.
- Every field in the picker is greyed out. None of that step’s fields can take this value. Hover a field for the reason.
- The wire is red and the flow will not save. The value comes from a step further along the path — see Red wires.
- The value is empty in chat. Check that the step it comes from really ran on that path: a condition may have sent the run another way. A value handed out by a group only exists after the exits that hand it out — reuse a set of nodes as a group explains exits.
- I cannot see a wire for $(user). Trigger values are badges: select the step, or press Show all data wires.
- The value I want is under +N. Use Insert… on the field; the wire appears once it is in.
Was this guide helpful?
Thanks. Your answer helps us decide which guides to improve.